If you want to know more about the Windows 10 telemetry feature, the guide below will give you all the information about what it is, what it tracks, and how to disable it from your Windows computer.
What is Windows Telemetry Data?
Windows 10 comes with a default-enabled telemetry feature that helps Microsoft collect all sorts of system diagnostics information of your device, including location activity, browsing history, types of hardware devices being used, recently installed applications, etc. Microsoft gathers the telemetry data in Windows 10 due to the following reasons:
It uses the diagnostic data to provide the latest Windows updates.Keep Windows secure and troubleshoot problems.Improve end-user productivity.Provide users with the most personalized Windows experience.
Also See: Best Lightweight Antivirus for Windows 10 These are some of the major reasons why Microsoft collects the telemetry data in Windows 10. According to Microsoft, the obtained Windows diagnostic data is used for providing better user experience rather than user targeting. On the contrary, the addition of telemetry feature in Windows 10 OS has been criticized by several experts and users who take their privacy and security very seriously. Thus, in this tutorial, we will give you a clear insight on how to disable all telemetry and data collection in windows 10. Keep reading ahead, our next segment will educate you about the same!
How to Disable Telemetry and Data Collection on Windows 10
Turning off telemetry data is a pretty straightforward process. Here’s a quick guide on how to disable telemetry and data collection feature in windows 10.
Method 1: Change the Windows Diagnostic and Usage Data Settings
This is one of the simplest solutions to disable and fix Microsoft compatibility telemetry high disk usage. To do so, follow the simple steps below:
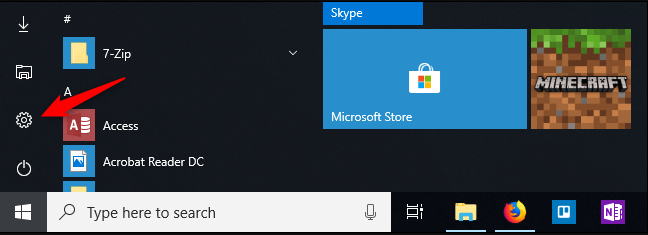
Click on the Windows icon, followed by the ‘Settings’ option.
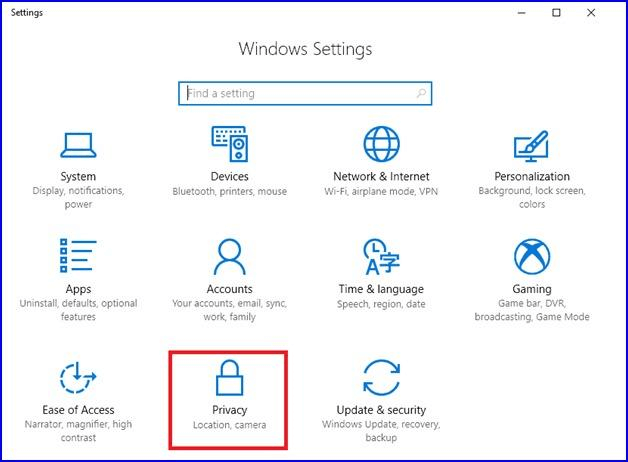
Under Windows Settings, select the ‘Privacy’ option.
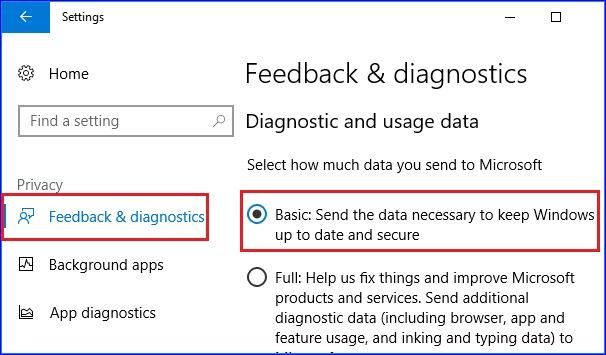
On the next screen, select ‘Feedback & diagnostics’ from the left pane and then change set the Diagnostics and usage data settings to basic.
Performing the above-listed steps will help you limit the amount of data sent to Microsoft. This will help you keep your personal information away from Microsoft to some extent. However, if you want to learn how to disable windows 10 telemetry and data collection completely, move to the next method. Also See: 15 Best Windows 10 Customization Software
Method 2: Disable Telemetry on Windows 10 Using Registry Editor
If you don’t want Microsoft to access any of your information, you can take the help of the Windows Registry Editor to completely shut down telemetry service in Windows 10. Just follow the simple steps below:
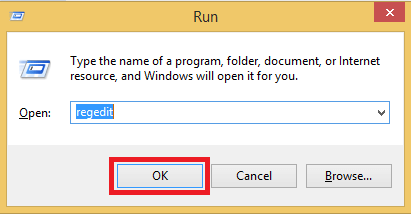
Open the Run dialog box by pressing the ‘Win + R key’ simultaneously.Now type in ‘regedit’ and click ‘OK’ to open the Registry Editor.
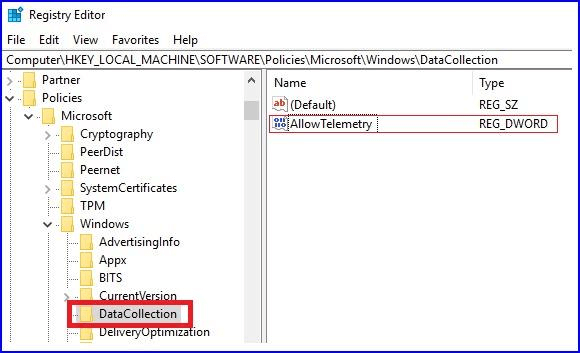
Now, navigate to the following path:
HKEY_LOCAL_MACHINE\SOFTWARE\Policies\Microsoft\Windows\DataCollection
Here right-click on the ‘DataCollection’ folder, select New, and then tap on the DWORD (32-bit) Value. Give this new DWORD value the name of ‘AllowTelemetry.’
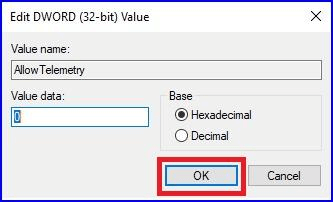
Double-click on the DWORD named ‘AllowTelemetry’ and set its value to ‘0’. Lastly, click on the ‘OK’ button.
See how easy it was. Performing the aforementioned steps will help you permanently disable and fix Microsoft compatibility telemetry high disk usages issues. Also See: Best Registry Cleaner Software For Windows 10/8/7
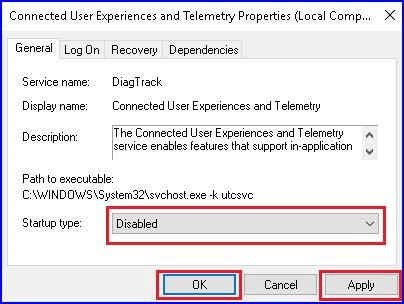
Method 3: Disable Connected User Experience & Telemetry Component Settings
After you have turned off Windows 10 telemetry feature using Registry Editor, it is suggested to disable the Connected User Experiences and Telemetry service. Doing this will ensure the complete shutdown of telemetry and data collection in windows 10. Below are the steps to do so:
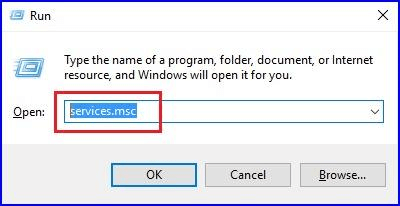
Press ‘Win + R key’ at the same time to open Run dialog box and then type in services.msc and hit enter or click the ‘OK’ button.
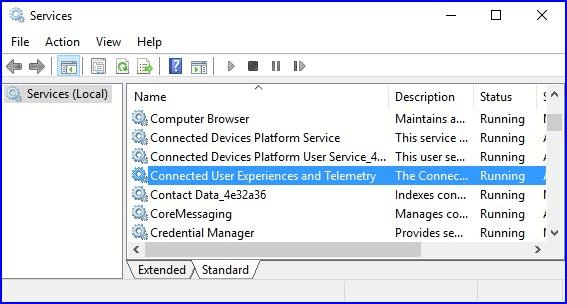
On the local Services screen, double-click on the ‘Connected User Experiences and Telemetry’.
On the next window, turn off windows 10 telemetry service by setting ‘Startup Type’ to ‘Disabled’.
Again on the local Services screen, double-click on ‘dmwappushsvc’ service and set the ‘Startup Type’to ‘Disabled’.
Doing this will disable telemetry and data collection in Windows 10 and will thereby prevent Microsoft from snooping on your computer habits. Also See: 14 Must Have Software For Windows 10
Final Words: Is Windows 10 Telemetry Feature Disabled?
These are some of the easiest methods that would assist you in how to disable windows 10 telemetry and data collection. We hope after performing the aforementioned steps you would be able to turn off the telemetry service that is helping Microsoft in keeping a track of everything you do online. Do not hesitate to contact us if you face any further Microsoft compatibility telemetry high disk usage problems. Just leave a comment below and we will help you resolve the issue in the best way possible.