With a compact design and excellent document-management software, Fujitsu ScanSnap S1300i is one of the best portable scanners around today. However, when the ScanSnap S1300i driver goes missing, gets corrupted or outdated, the document scanner starts running into numerous problems. That makes keeping the ScanSnap S1300i scanner drivers up-to-date extremely important. To make things easier for you, we have prepared this step-by-step ScanSnap S1300i drivers download and update guide. With the help of methods listed in the below segment, you can easily download and install Fujitsu ScanSnap S1300i drivers on Windows 10.
Methods to Download Fujitsu ScanSnap S1300i Driver Scanner for Windows 10
Use the following methods to download and install the latest drivers for your ScanSnap S1300i scanner. If you don’t have the required technical skills to update drivers manually, then you can use Bit Driver Updater to automatically update ScanSnap S1300i drivers Windows 10. It is the safest way to perform driver updates. Also, with this driver updater software, you can repair all broken drivers with a click of the mouse. Additionally, trying Bit Driver Updater is absolutely free, just click on the download button below.
Method 1: Fujitsu ScanSnap S1300i Driver Download via Official Website
You can manually download the updated ScanSnap S1300i driver file for your scanner from the official Fujitsu website. Here are the steps you need to perform to get the ScanSnap S1300i installer package for your computer’s operating system.
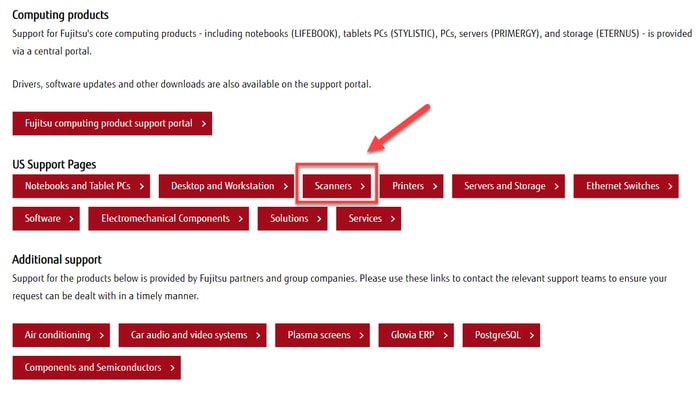
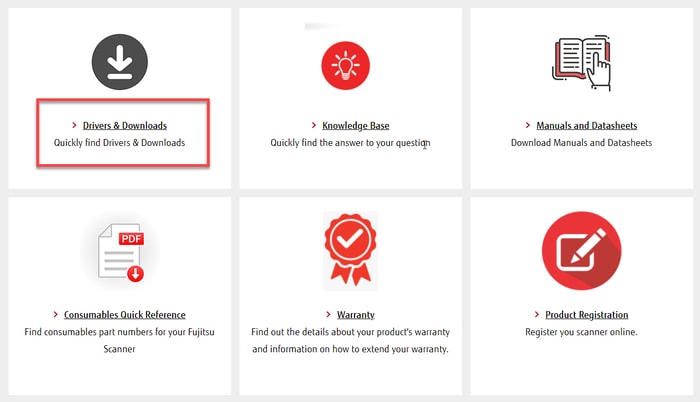
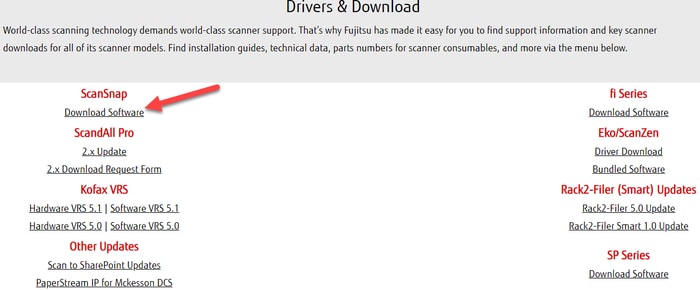
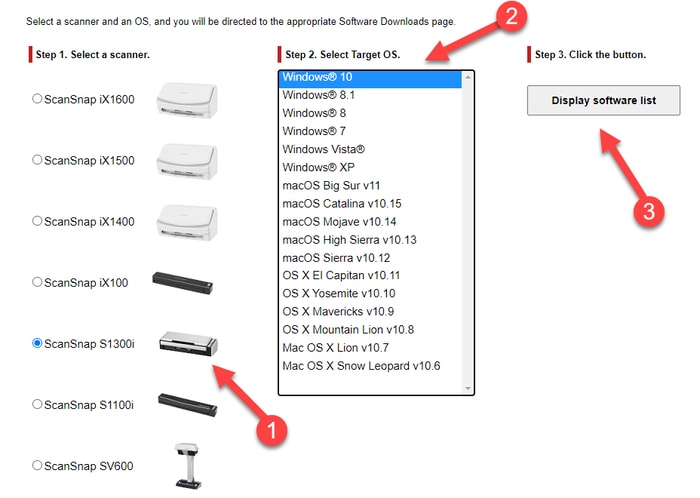
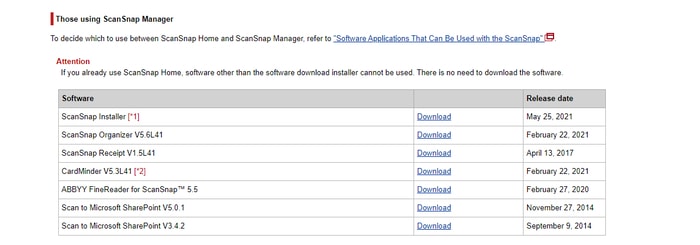
Visit the official Fujitsu Global website.On the top of the page, expand the Products section and select the Product Support.Now, you need to select your region to find local support in your country.Next, select the computing product (e.g., scanner) for which you’re looking to find support.On the Scanner Resource Center page, scroll down and click on the Drivers & Downloads.Next, click on the Download Software hyperlink present underneath the ScanSnap.On the ScanSnap Software Downloads page, select ScanSnap S1300i, choose the target operating system and then tap on the Display software list.Click on the Download link available next to the ScanSnap Installer.Double-click on the downloaded ScanSnap S1300i installer file and follow the wizard to finish the installation procedure.After the update is installed, restart your computer to apply the changes.
Also Read: Download, Install and Update ScanSnap iX500 Driver for Windows
Method 2: Fujitsu ScanSnap S1300i Scanner Driver Download via Device Manager
Device Manager is another useful solution that one can use to manually download ScanSnap S1300i drivers for Windows 10. Below we have provided detailed instructions to help you carry out the driver install procedure through the Windows Device Manager tool.
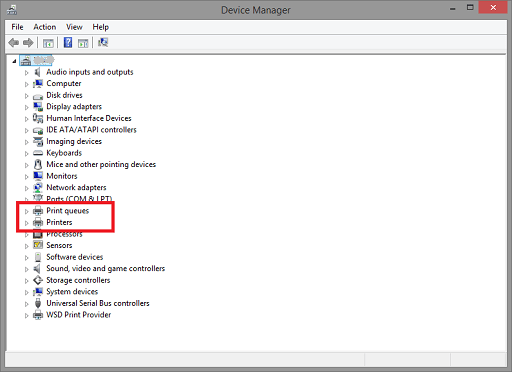
Press Windows logo + X keys together and select Device Manager from the menu that appears.Once the Device Manager launches, find and expand the category named Printer or Print Queues.Right-click on your Fujitsu ScanSnap S1300i Scanner and select the Update driver option from the pop-up menu.Now, you’ll get two choices to update ScanSnap S1300i driver. You need to select the first one, i.e., Search Automatically for the Updated Driver Software.
The Windows operating system will now scan online for the latest ScanSnap software driver updates and install the same on your laptop or desktop system. Also Read: How to Fix USB Device Not Recognized Error in Windows 10/8/7
Method 3: ScanSnap S1300i Driver Download & Install via Bit Driver Updater (Recommended)
If the manual methods listed above seem tiring, or you don’t have the technical skills to update ScanSnap S1300i scanner drivers on your own, try using Bit Driver Updater. This best Windows driver updating software automatically recognizes your system configuration and finds the latest WHQL certified driver versions for it. Besides updating the outdated drivers automatically in one click, the software allows you to take the complete backup of old drivers and restore the same as per your requirements.
How to Use Bit Driver Updater to Download ScanSnap S1300i Drivers on Windows 10
To use Bit Driver Updater, follow the steps below:
Download and install Bit Driver Updater.
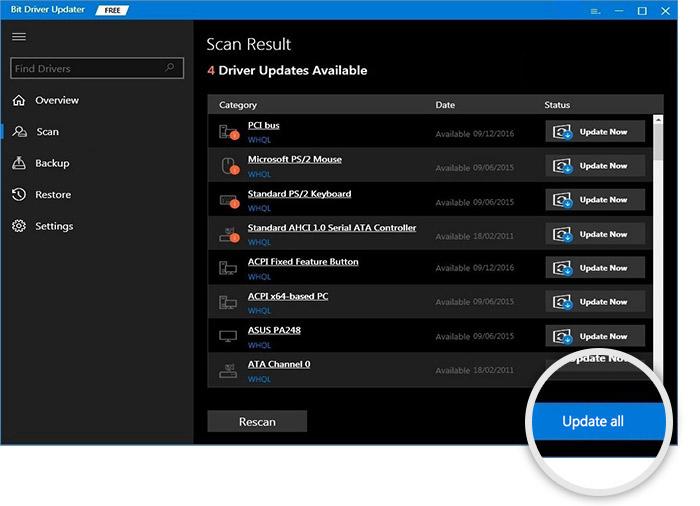
Run the program and click Scan Drivers to identify problematic device drivers.After scanning is done, go to the Fujitsu ScanSnap S1300i scanner driver and tap on the Update Now button beside it.
Also Read: How to Update USB Driver in Windows 10,8,7 {Quick Tips}
Concluding Words: Fujitsu ScanSnap S1300i Scanner Driver Download Windows 10
Through this blog article, we shared the best methods to update or download ScanSnap S1300i drivers for Windows 10. To keep your ScanSnap S1300i scanner running in tip-top shape, you can any of the aforementioned methods to get the latest driver software. We hope you find the information helpful and the steps easy to use. In case you have any queries or suggestions, please feel free to leave them in the comments box below.


![]()